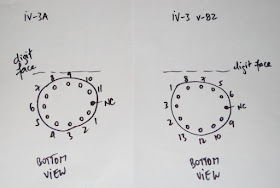
Firstly, it is important to note that, although the assembly manual for IV-3 shield refers to it as "IV-3/IV-3a/IV-6 VFD shield for Arduino", which would make you think one could install either IV-3, IV-3A or IV-6 tubes, this is not quite the case. The reason is the difference in pin configuration:
- IV-3: 9-segment + dot, 14 pins (1 not connected)
(pin configuration is bottom view)
- IV-3A and IV-6: 7 segment + dot, 12 pins (1 not connected)
(pin configuration is bottom view)
- and then, there is IV-3 v-82, which I bought on ebay: 7 segment + dot, 14 pins (3 not connected)
(pin configuration is top view)
IV-3 v-82 (as I named it, based on the printing on the back of the tube), is an amalgamation between IV-3 and IV-3A:
- can be found in either 7 segment or 9 segment (+ dot), although only 7 segments are connected;- has 14 pins (as to support a 9 segment digit + dot), with 3 not connected;
- pin sequence differs from both IV-3 and IV-3A;
- the "key" (the trimmed unconnected pin) is on the opposite side compared to IV-3/IV-3A.
Below are some photos, with the "axiris" IV-3A on the left.
To adapt the IV-3 v-82 tube to the Axiris board, the pins need to be scrambled like this:
which leads to this ugly assemblage:
Conclusion: Pay attention when (and if) you order the tubes for "Axiris IV-3 VFD shield" separately. The sure bet is to order IV-3A, with the white ceramic insulator, and the trimmed pin on the right side (when looking at the digit).
P.S. Also, make sure the tubes are "mirrory" black at the top. If the top is white, then the tube is damaged for sure, air got in the tube (basically the tube's glass is cracked), like in the photo below (right tube is damaged).


