Friday, October 8, 2021

A virtual tour of the computer birthplace

Travel is not easy these days. Luckily we have youtube, social distancing networks and friends who share photos from their excursions and adventures. Here are some from the famous Bletchley Park, where Colossus was invented (and de-classified decades later). No wonder few know that this was actually the first computer, created by Tommy Flowers.

Colossus was recreated more than 50 years later from (human) memory, notes and imagination, blueprints destroyed long ago. It is on display in the National Museum of Computing, a separate entity from Bletchley Park museum (and therefore no photos of Colossus, just yet).


Thursday, June 3, 2021

Assembling the Pro Mini OLED clock shield kit

Customers complained about the lack of documentation on the Pro Mini OLED clock kit.

I listened and I agree. Even though the silkscreen should provide the necessary directions for soldering the parts on the shield itself, adding the Pro Mini board and the OLED display are still ambiguous, especially because there are multiple options.

Here is a quick, but hopefully adequate, step-by-step guide on one way to assemble this clock kit.

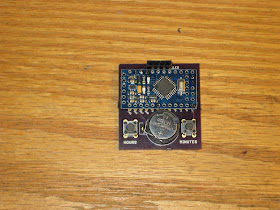
1. Make sure you source the correct Pro Mini board, that looks similar to the one in the photos below. It features an ATmega328 clocked at 16MHz.


Note that SCL and SDA (A5, A4 respectively) are broken out. Also, the FTDI connects directly to the side of the Pro Mini board.


2. Program the board itself with the OLED Clock sketch. In Tools/Board, select "Arduino Duemilanove w/ ATmega328". Upload using the FTDI adapter. This step is important because you want to make sure your Pro Mini works before you mount/solder it.

3. Make sure you source the correct I2C 128x64 OLED display, like the one shown below.


The pins at the top must be in the order (left to right) VCC-GND-SCL-SDA or VCC-GND-SDA-SCL.

In case your display has a different arrangement of the pins, e.g. GND-VCC-SCL-SDA, you will need to swap the leftmost two pins, by rewiring the traces (cut, then reconnect) on the shield's PCB (not on the display, which remains untouched), as explained in Step 6.

4. Solder the DS1307, paying attention to the correct orientation (notch up), then the 2 resistors and the crystal.

5. Solder the 2 jumper bridges according to the OLED display you are going to use.


If your OLED has pin 3 and 4 configured as SCL and SDA respectively, then solder the right bridge of the left jumper and the left bridge of the right jumper (see the photo below).


6. Only if necessary
Remember, the Pro Mini OLED shield was designed for I2C OLED displays that have pin 1 as VCC and pin 2 as GND. If that is not the case (as in the photo below),

those first 2 pins must be rewired, as shown (after the traces had been cut and pins isolated).


7. Solder the Pro Mini board on top and close to the OLED shield, using machined male pins (included in the kit). Only the relevant pins, highlighted in the photo below, need to be soldered.


Pay attention, since this is a hard-to-reverse move. Fixing a mistake here involves de-soldering. Also, the parts underneath cannot be (easily) accessed anymore.

8. Solder the 4-pin female header, the 2 buttons and the battery holder, then insert the CR1225 battery, with the correct polarity (+ on top).


9. Insert the OLED display.

10. Power the clock through the FTDI breakout (observe the correct orientation) or by directly wiring VCC and GND to a 5V or battery source.
Any of the 5 clock faces can be selected by pushing simultaneously the 2 buttons.
Pressing each button individually will increment either the hours or the minutes.


Saturday, April 3, 2021

Great 8 character fluorescent (VFD) display

 In the process of expanding the family of supported displays for the WiFiChron clock, I found this amazing VFD module on aliexpress:

It has an SPI interface, it is powered by 5V, character set is defined and stored internally.

A quick search produced a sketch and documentation for the driver, PT6302.

According to the PCB silkscreen, the VFD module is powered by 5V, but the signals are 3V3. (The 30V required by the VFD glass itself is made by the on-board switching mode power supply, so no need to worry about generating high voltage externally.) An ESP32 board would be the perfect candidate to control this display. Luckily, the found sketch was also written for ESP32, so all I had to do was compile and upload using Arduino IDE 1.8.13. The only problem was that my IDE installation did not show ESP32 boards anymore, even though I used it once previously. Therefore, I had to re-visit the whole setup process once again. This time I am documenting it, to save on any future effort. So here are the steps:

  • install Arduino IDE (1.8.13, in my case) from Windows store, placed here:

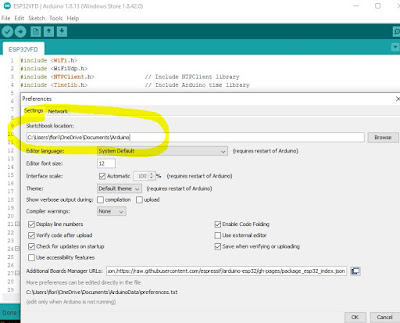
  • add the ESP32/expressif package URL for the Boards Manager, as nicely explained here; essentially, select menu File -> Preferences, then add line
https://raw.githubusercontent.com/espressif/arduino-esp32/gh-pages/package_esp32_index.json
to input box "Additional Boards Manager URLs".
  • install the set of ESP32 boards in "Boards Manager"; menu Tools -> Boards Manager:
  • select the proper board for the ESP32-WROOM dev kit that I used; menu Tools -> Boards Manager -> ESP32 Arduino -> Node32s;
  • open the sketch, then modify the SPI pins (I used DIN=33, CLK=12, CS=13, RST=27, all on the same side of the ESP32 dev module); got compilation error "Library not found" for both NTPClient and TimeLib;
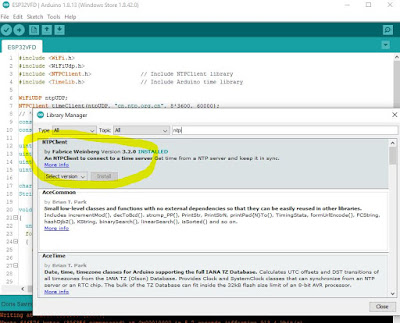
  • install the missing libraries, through menu Tools -> Manage Libraries...
The 2 libraries have been installed here
at the location specified in File -> Preferences:
  • compile, then upload successfully.
Surprisingly easy, straightforward and without glitches, this must have been the easiest ever first-time  interfacing with a device.

Compared to the HDSP-2534 LED display, the characters in the VFD module are about 50% bigger, and much brighter, making it readable from a greater distance. The current consumption is in the range 100-200mA, versus about 20mA taken by the HDSP display.


Also, at just about US$13, this (yet unnamed, or maybe Futaba?, see photo below) VFD display makes a great functional alternative for the more expensive HDSP/Avago/Siemens/Osram 8-character LED displays.


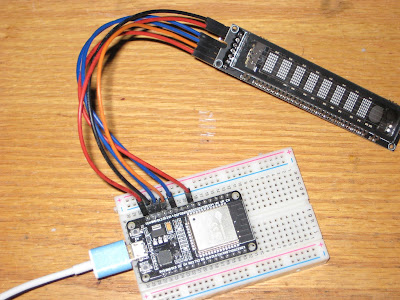
For the record, this was my setup:


And the (modified, barebone) sketch:
#include <WiFi.h>
#include <WiFiUdp.h>
#include <NTPClient.h>
#include <TimeLib.h>

WiFiUDP ntpUDP;
NTPClient timeClient(ntpUDP, "cn.ntp.org.cn", 8*3600, 60000);
const char *ssid     = "<wifinet>";
const char *password = "<password>";

uint8_t din   = 33; // DA
uint8_t clk   = 12; //23; // CK
uint8_t cs    = 13; //19; // CS
uint8_t Reset = 27; //22; // RS

char *str_time = "00:00:00";
String format_time = "00:00:00";

void write_6302(unsigned char w_data)
{
  unsigned char i;
  for (i = 0; i < 8; i++)
  {
    digitalWrite(clk, LOW);
    if ( (w_data & 0x01) == 0x01)
    {
      digitalWrite(din, HIGH);
    }
    else
    {
      digitalWrite(din, LOW);
    }
    w_data >>= 1;
    digitalWrite(clk, HIGH);
  }
}

void VFD_cmd(unsigned char command)
{
  digitalWrite(cs, LOW);
  write_6302(command);
  digitalWrite(cs, HIGH);
  delayMicroseconds(5);
}

void S1201_show(void)
{
  digitalWrite(cs, LOW);
  write_6302(0xe8);
  digitalWrite(cs, HIGH);
}

void VFD_init()
{
  // set number of characters for display;
  digitalWrite(cs, LOW);
  write_6302(0xe0);
  delayMicroseconds(5);
  write_6302(0x07);  // 8 chars;
  digitalWrite(cs, HIGH);
  delayMicroseconds(5);

  // set brightness;
  digitalWrite(cs, LOW);
  write_6302(0xe4);
  delayMicroseconds(5);
  write_6302(0x33); // level 255 (max);
  digitalWrite(cs, HIGH);
  delayMicroseconds(5);
}

void S1201_WriteOneChar(unsigned char x, unsigned char chr)
{
  digitalWrite(cs, LOW);
  write_6302(0x20 + x);
  write_6302(chr + 0x30);
  digitalWrite(cs, HIGH);
  S1201_show();
}

void S1201_WriteStr(unsigned char x, char *str)
{
  digitalWrite(cs, LOW);
  write_6302(0x20 + x);
  while (*str)
  {
    write_6302(*str); // ascii
    str++;
  }
  digitalWrite(cs, HIGH);
  S1201_show();
}

void setup()
{
  WiFi.begin(ssid, password);
  Serial.begin(115200);
  Serial.print("Connecting.");
  while ( WiFi.status() != WL_CONNECTED ) {
    delay(500);
    Serial.print(".");
  }
  Serial.println("connected");
 
  timeClient.begin();

  pinMode(clk, OUTPUT);
  pinMode(din, OUTPUT);
  pinMode(cs, OUTPUT);
  pinMode(Reset, OUTPUT);
  digitalWrite(Reset, LOW);
  delayMicroseconds(5);
  digitalWrite(Reset, HIGH);
  VFD_init();
}

void loop()
{
  timeClient.update();
  format_time = timeClient.getFormattedTime();
  char *str_time = &format_time[0]; 
  S1201_WriteStr(0, str_time);
  Serial.println(timeClient.getFormattedTime());
  delay(1000);
}

Next step should be researching the PT6302 command set, finding out how to adjust brightness and others.


Sunday, March 7, 2021

Biggest WiFiChron display so far

In the world of 16-segment displays, Klais-16 is the biggest I have seen, at about 8cm (3") character height. Multiple displays can be daisy-chained and controlled through serial communication (1 pin, TX). It is open source and available to buy on Tindie at the very reasonable price of US$15 a piece.

The biggest challenge was mechanical, particularly, finding a way to mount the 8 individual displays. Let me explain. I received the displays as ready-to-use (assembled, programmed and tested) products. I did  not expected to dis-assemble them (not even partially) in order to mount them. The two mounting methods described in the documentation (using 15mm and 20mm profiles, respectively) ask for just that, basically to cut the original plastic rivets and, eventually, to replace them with (your own) M3 screws when fixing them to the rails. (I actually started going along with either described method until I realized I did not want to open them up). The easiest solution I found in the end was to use 1/2" x 1/2" L-profile, as shown below. For this, I only cut the middle rivets and used the holes to screw each individual display to the rails.


The software support consists in adding one class, DisplaySoftSerial.cpp, shown below.

#include <Arduino.h>
#include <SoftwareSerial.h>
#include "DisplaySoftSerial.h"

SoftwareSerial ss(7, 2);	// RX not used; TX=2;

//******************************************************************
//
void Display_t::setup()
{
  ss.begin(19200);
}

//******************************************************************
// draw the 8 characters on the screen;
//
void Display_t::writeDisplay(char* displayBuffer)
{
  char reverseBuffer[9] = {0};

  for (byte i=0; i<9; i++)
  {
    reverseBuffer[i] = (displayBuffer[7-i]);
  }
  ss.write(reverseBuffer);
}

//*******************************************************************
// brightness level is number between 0 and 7, 0 being the brightest;
//
void Display_t::setBrightness(uint8_t brightness)
{
  // cannot do;
}

//*******************************************************************
//
void Display_t::reset()
{
}


The Klais-16 display's baud rate can be selected in the range 4800 to 115200, through solder jumpers. The default (no soldering) is 115200. I set it to 19200 because:
  • SoftwareSerial library cannot handle 115200
  • only one solder bridge is required
As you can see from the code above, the brightness cannot be adjusted (or at least I am not aware). Maybe future versions will implement this feature.

The WiFiChron with the 8 Klais-16 displays consumes an average of 700mA (at 5V). The brightness is not amazing, probably because some of the light is absorbed by the top translucent PCB.
I think it can make a great clock for interiors (schools, hallways etc.), visible from at least 10 meters away.


Friday, February 19, 2021

Single digit clock - method and apparatus

I recently found, at the bottom of a drawer, my forgotten numitron single-tube clock. It has a LiPo battery which still lights up the filaments, but no RTC to actually show time. It has a single button, which activates the display (numitron tube) when pressed. Indeed, some digits flash on, but inconsistently. And, as a clock, one would want to be able to also set the time, which is definitely not possible in this current version.

The required revision consists in:

  • adding RTC
  • adding a second button
  • updating the software (by adding the ability to set the time through buttons)

The method I devised for setting up the time follows this state-machine diagram,

where "Set time" state is part of this bigger picture:


The single digit clock has 2 buttons: "Activate", which shows the time in a sequence of 3 or 4 digits, formatted as "Hh-Mm" or "h-Mm", and "Set", which starts the process of setting up the time. This is where most of the effort was put, since the actual displaying of time is really trivial.

The whole source code file is proudly presented below (as answer to the lots of questions in the above mentioned old post).

/*************************************************************************
* Sketch for direct driving 7-segment numitron IV-9
*
* Segments are defined as follows:
*
*      A
*     ---
*  B |   | C
*     ---  D
*  E |   | F
*     ---
*      G
*
* Decimal point/comma is segment H.
* Common pin is wired to Vcc (would be nice to wire it to D11/MOSI
*      instead, which is also PWM (for brightness)).
* To light up a segment, just connect it to GND.
*
* To display a digit, ground these Arduino pins:
*   0: 6, 7, 8, 10, 11, 13
*   1: 7, 8
*   2: 6, 8, 10, 11, 12
*   3: 6, 7, 8, 11, 12
*   4: 7, 8, 12, 13
*   5: 6, 7, 11, 12, 13
*   6: 6, 7, 10, 11, 12, 13
*   7: 6, 7, 8
*   8: 6, 7, 8, 10, 11, 12, 13
*   9: 6, 7, 8, 11, 12, 13
*
*************************************************************************/

#include <Arduino.h>
#include <Wire.h>
#include "DS1307.h"

#define _DEBUG_

// arduino pins connected to tube terminals;
// chosen based on the natural positioning of the Numitron tube on Pro Mini board;
#define segA  6  	// tube pin 5
#define segB  13	// tube pin 6
#define segC  8  	// tube pin 3 
#define segD  12	// tube pin 7
#define segE  10	// tube pin 9
#define segF  7         // tube pin 4
#define segG  11	// tube pin 8
#define segH  9  	// tube pin 2

// button to initiate the setting up of the time;
#define PIN_BUTTON_SET_TIME  4   // D4

// button to activate the display or to increment the time digit;
#define PIN_BUTTON_ACTIVATE  17  // A3


byte segmentPin[8] = {segA, segB, segC, segD, segE, segF, segG};


byte digits[10][7] =
{
// A  B  C  D  E  F  G
  {0, 0, 0, 1, 0, 0, 0}, 	// 0
  {1, 1, 0, 1, 1, 0, 1}, 	// 1
  {0, 1, 0, 0, 0, 1, 0}, 	// 2
  {0, 1, 0, 0, 1, 0, 0},  	// 3
  {1, 0, 0, 0, 1, 0, 1},  	// 4 
  {0, 0, 1, 0, 1, 0, 0},   	// 5
  {0, 0, 1, 0, 0, 0, 0},   	// 6
  {0, 1, 0, 1, 1, 0, 1},   	// 7
  {0, 0, 0, 0, 0, 0, 0},   	// 8
  {0, 0, 0, 0, 1, 0, 0}  	// 9
};


byte state[4][7] =
{
// A  B  C  D  E  F  G
  {1, 0, 0, 0, 0, 0, 1}, 	// H
  {1, 0, 1, 0, 0, 0, 1}, 	// h
  {0, 0, 0, 1, 0, 0, 1}, 	// M
  {1, 1, 1, 0, 0, 0, 1},  	// m
};


volatile boolean wasTimeEverSet = false;
volatile boolean showingTime    = false;
volatile boolean settingTime    = false;

byte crtIndex = 0;  // 0..3, index in array timeDigits;
byte timeDigits[4] = {0, 1, 2, 3};
int hour   = 0;
int minute = 0;
int second = 0;
byte  crtValue =  0;  // used when setting the time, one digit at a time (for HHMM);
short crtState = -1;  // used when setting the time;
boolean newState = false;


void setup()
{
#ifdef _DEBUG_
  Serial.begin(9600);
  Serial.println("in setup");
#endif

  // each of display's 7 segment is connected to an output;
  for (byte i=0; i<7; i++)
  {
    pinMode(segmentPin[i], OUTPUT);
  }

  // buttons to activate tube and for setting up the time;
  pinMode(PIN_BUTTON_ACTIVATE, INPUT_PULLUP);
  pinMode(PIN_BUTTON_SET_TIME, INPUT_PULLUP);

  blankDisplay();
}


void loop()
{
  if (digitalRead(PIN_BUTTON_ACTIVATE) == LOW)
  {
#ifdef _DEBUG_
    Serial.print("settingTime=");
    Serial.println(settingTime);
#endif
    delay(200);	// debouncing;

    if (settingTime)
    {
      newState = false;

      crtValue++;
      if (crtValue > 9)
          crtValue = 0;
      displayValue(crtValue);

#ifdef _DEBUG_
      Serial.print ("crtValue=");
      Serial.println(crtValue);
#endif
    }
    else
    {
      getTimeFromRTC();
      splitTime();

      // show time as (h)h-mm;
      showingTime = true;
    }
  }
  
  if (digitalRead(PIN_BUTTON_SET_TIME) == LOW)
  {
    delay(200);	// debouncing;

#ifdef _DEBUG_
    Serial.print("crtState=");
    Serial.println(crtState);
#endif

    if (crtState == -1)
    {
      // user is initiating setting up the time;
      settingTime = true;
    }
 
    if (settingTime)
    {
      newState = true;
      crtState++;
    }

#ifdef _DEBUG_
    Serial.print("settingTime=");
    Serial.println(settingTime);
#endif
  }

  if (showingTime)
  {
#ifdef _DEBUG_
    Serial.print  ("show time, digit ");
    Serial.println(crtIndex);
#endif
    if (crtIndex == 0 && timeDigits[0] == 0)
    {
      // do not show the leading 0; 
    }
    else
    {
      if (crtIndex == 2)
      {
        // show the dash between hours and minutes;
        displayDash();
        // hold it for a second;
        delay(1000);
      }

      // make the digit flash (otherwise, if 2 consecutive digits are the same, you won't see a difference);
      displayDigit(crtIndex);
      // hold the digit for a second;
      delay(1000);
    }

    crtIndex++;
    if (crtIndex > 3)
    {
      showingTime = false;  // time will show again when button is pressed;
      crtIndex = 0;
      blankDisplay();
    }
  }

  if (settingTime)
  {
    if (newState)
    {
      newState = false;

      // need to save the crtValue;
      if (crtState > 0)
      {
#ifdef _DEBUG_
        Serial.print("set value ");
        Serial.print(crtValue);
        Serial.print(" at index ");
        Serial.println(crtState-1);
#endif
        timeDigits[crtState-1] = crtValue;
      }

      if (crtState > 3)
      {
        settingTime = false;
        crtState = -1;
        blankDisplay();

#ifdef _DEBUG_
        Serial.print("saving time: ");
        Serial.print(10 * timeDigits[0] + timeDigits[1]);
        Serial.print(":");
        Serial.println(10 * timeDigits[2] + timeDigits[3]);
        Serial.print("settingTime=");
        Serial.println(settingTime);
#endif
        // time is set only after all 4 digits (HhMm) were input, that is, after state "m" is left;
        setTime(10 * timeDigits[0] + timeDigits[1], 10 * timeDigits[2] + timeDigits[3], 0);
      }
      else
      {
        displayCrtState();  // one of the 4: H, h, M, m
        // hold it for a bit;
        delay(100);

        // start setting the value from 0;
        crtValue = 0;
      }    
    }
  }
}


void displayDigit(byte index)
{
  blankDisplay();
  delay(100);

  byte digit = timeDigits[index];

  // turn on the necessary segments of the digit;
  for (byte i=0; i<7; i++)
  {
    digitalWrite(segmentPin[i], digits[digit][i]);
  }
}


void displayValue(byte crtValue)
{
  blankDisplay();
  delay(100);

  // turn on the necessary segments;
  for (byte i=0; i<7; i++)
  {
    digitalWrite(segmentPin[i], digits[crtValue][i]);
  }
}


void blankDisplay()
{
  // turn off all 7 segments;
  for (byte i=0; i<7; i++)
  {
    digitalWrite(segmentPin[i], 1);
  }
}


void displayDash()
{
  blankDisplay();
  delay(100);
  digitalWrite(segD, 0);
}


void displayCrtState()
{
#ifdef _DEBUG_
    Serial.print  ("crt state is ");
    Serial.println(crtState);
#endif

  blankDisplay();
  delay(100);

  // turn on the necessary segments of the state/letter;
  for (byte i=0; i<7; i++)
  {
    digitalWrite(segmentPin[i], state[crtState][i]);
  }
}


//**********************************************************************************
// Read the entire RTC buffer
//
void getTimeFromRTC()
{
  int rtc[7];
  RTC_DS1307.get(rtc, true);

  // check to avoid glitches;
  if (rtc[DS1307_MIN] < 60 && rtc[DS1307_HR] < 24 && rtc[DS1307_SEC] < 60)
  {
    second = rtc[DS1307_SEC];
    minute = rtc[DS1307_MIN];
    hour   = rtc[DS1307_HR];
  }
/*
  // check to avoid glitches;
  if (rtc[DS1307_YR] <= 2050 && rtc[DS1307_MTH] <= 12  && rtc[DS1307_DATE] <= 31)
  {
    day    = rtc[DS1307_DATE];
    month  = rtc[DS1307_MTH];
    year   = rtc[DS1307_YR];
  }
*/  
  // The RTC may have a dead battery or may have never been initialized
  // If so, the RTC doesn't run until it is set.
  // Here we check once to see if it is running and start it if not.
  if (!wasTimeEverSet) {
    wasTimeEverSet = true;
    if (hour == 0 && minute == 0 && second == 0)
    {
      // set an arbitrary time to get the RTC going;
      setTime(10,23,45);
    }
  }

#ifdef _DEBUG_
    Serial.print("Time is ");
    Serial.print(rtc[DS1307_HR]);
    Serial.print(":");
    Serial.print(rtc[DS1307_MIN]);
    Serial.print(":");
    Serial.println(rtc[DS1307_SEC]);
#endif

}


//**********************************************************************************
//
void setTime(int hh, int mm, int ss)
{
  RTC_DS1307.stop();
  RTC_DS1307.set(DS1307_SEC,  ss);
  RTC_DS1307.set(DS1307_MIN,  mm);
  RTC_DS1307.set(DS1307_HR,   hh);
  RTC_DS1307.start();
}


void splitTime()
{
  timeDigits[0] = hour / 10;
  timeDigits[1] = hour % 10;
  timeDigits[2] = minute/10;
  timeDigits[3] = minute%10;
}

The single digit numitron clock is the simplest possible clock, in terms of the number of components included. The numitron tube is connected directly to the processor's outputs, the common electrode being wired to Vcc. I noticed that the 3.7V LiPo battery is not reliably capable to light up the filaments. USB's 5V gives the tube a stable functionality.

Below are some photos.


I was actually able to design the improvised RTC "shield" for ProMini shown in the above photo. Ordered from oshpark and shared here:


The "second" simplest single digit clock would be the one using a 7-segment LED display. It is the "second" simplest just because it requires 7 more current-limiting resistors. Otherwise, if the wiring (numitron tube and 7-segment display) is similar, the above code works with no changes (tried and proven).


Shown above is another ProMini-based prototype of a single digit clock, without the RTC shield. I expect this single digit 7-segment clock to work with the LiPo battery shield (unlike the single numitron clock). Note that the display is common anode, with the anode wired to Vcc and each cathode connected to processor's outputs. The segment is lit when the output is grounded (set to digital 0), similar to the numitron's driving.


Sunday, February 7, 2021

Enclosure ideas for WiFiChron and other clocks

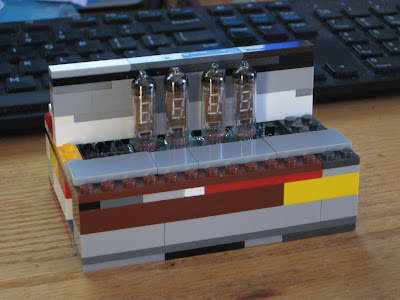
It turns out that most electronics, even prototypes, can be easily enclosed with Lego. And that means no screws, no glue, no fasteners, zero tools, just the bricks and some imagination.

This is the HDSP clock variant with 1" displays driven by HT16K33 (introduced here). The board was cut and filed (0.5mm on each side) to fit snug between the walls (see this).


Next is a HDSP clock variant with two Adafruit Quad Alphanumeric displays.


Similarly, the PCB was cut and filed a bit. The assembly fits solidly between the bricks (no movement when shaken). As in the previous build, the exposed PCB is kind-of-required to allow access to the two buttons (set hours, set minutes).

Both of the above can be mounted on a Lego wall (as found in schools) or they can desk-stand on their own.

Here is an example of a Lego-encapsulated WifiChron.


The PCB was also filed about 0.5mm on each side to fit between the lateral brick walls. It did not have to be fastened in any other way. The ESP8266 module fits inside nicely. The 3 buttons and the USB mini B connector are all easily accessible from the back.

Below is the Lego version of the Axiris clock.


Since it does not have any buttons, the time is set through Bluetooth (command "SET TIME=hh:mm", sent from Terminal app while BT paired).

And finally, a couple of OLED clocks, both running the same software on similar hardware: pro-mini + OLED shield and wsduino + 2.42" OLED shield, respectively.


Note that this is the prototype version, using a LiPo battery with charger (similar to the one shown here).


Again, all the above enclosures feel solid: nothing moves or rattles when upside down or even shaken. I did not try dropping them though :)

And lastly, the WiFiChron with Adafruit quad 0.56" displays from the previous post, sandwiched between scrap plexiglass plates: