Showing posts with label review. Show all posts

Saturday, April 3, 2021

Great 8 character fluorescent (VFD) display

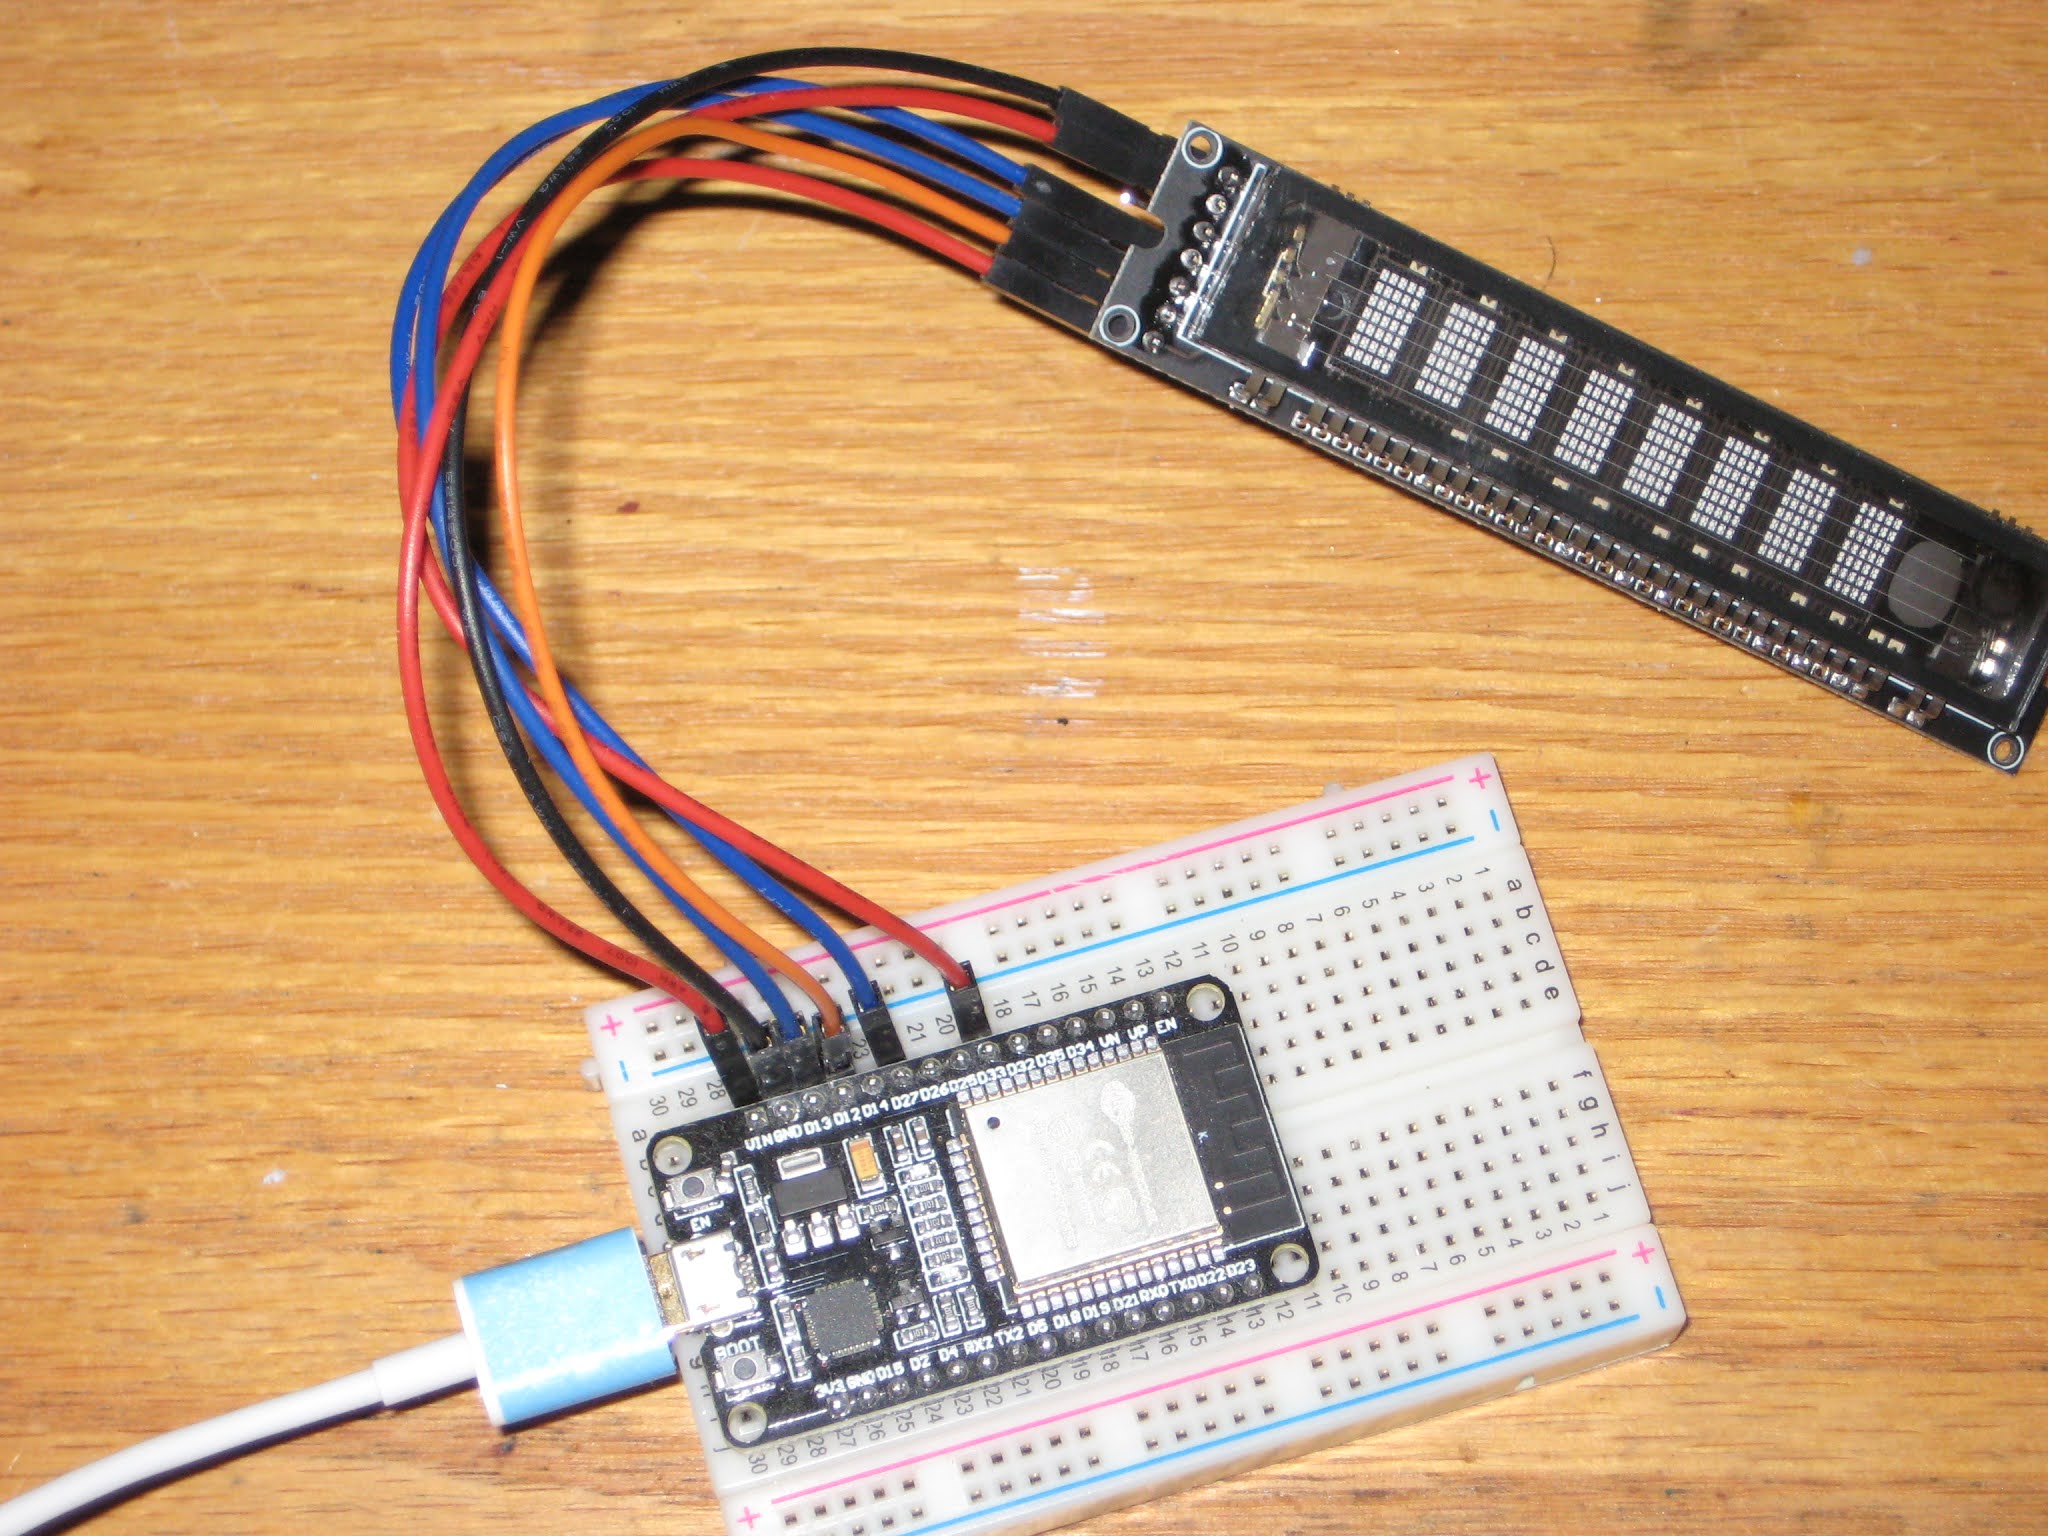
 In the process of expanding the family of supported displays for the WiFiChron clock, I found this amazing VFD module on aliexpress:

It has an SPI interface, it is powered by 5V, character set is defined and stored internally.

A quick search produced a sketch and documentation for the driver, PT6302.

According to the PCB silkscreen, the VFD module is powered by 5V, but the signals are 3V3. (The 30V required by the VFD glass itself is made by the on-board switching mode power supply, so no need to worry about generating high voltage externally.) An ESP32 board would be the perfect candidate to control this display. Luckily, the found sketch was also written for ESP32, so all I had to do was compile and upload using Arduino IDE 1.8.13. The only problem was that my IDE installation did not show ESP32 boards anymore, even though I used it once previously. Therefore, I had to re-visit the whole setup process once again. This time I am documenting it, to save on any future effort. So here are the steps:

  • install Arduino IDE (1.8.13, in my case) from Windows store, placed here:

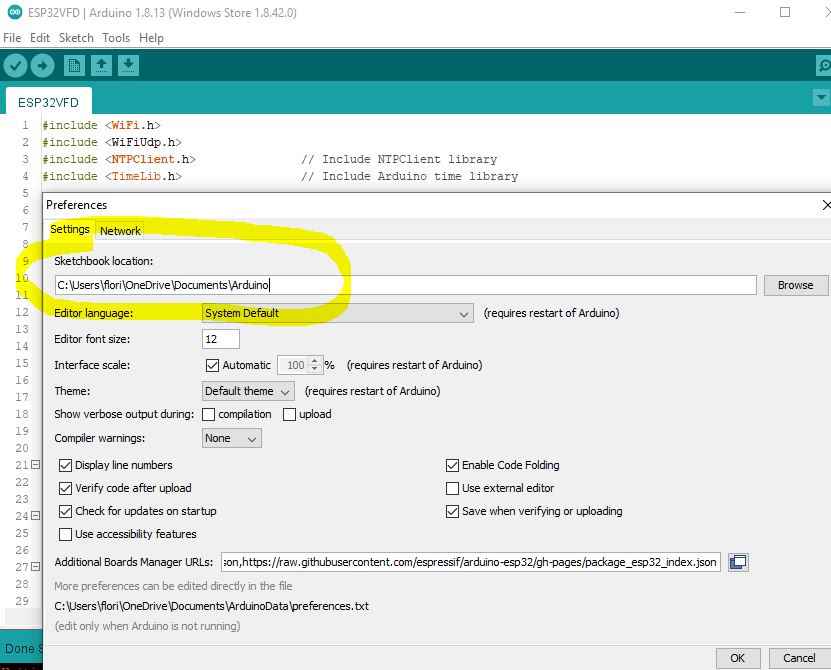
  • add the ESP32/expressif package URL for the Boards Manager, as nicely explained here; essentially, select menu File -> Preferences, then add line
https://raw.githubusercontent.com/espressif/arduino-esp32/gh-pages/package_esp32_index.json
to input box "Additional Boards Manager URLs".
  • install the set of ESP32 boards in "Boards Manager"; menu Tools -> Boards Manager:
  • select the proper board for the ESP32-WROOM dev kit that I used; menu Tools -> Boards Manager -> ESP32 Arduino -> Node32s;
  • open the sketch, then modify the SPI pins (I used DIN=33, CLK=12, CS=13, RST=27, all on the same side of the ESP32 dev module); got compilation error "Library not found" for both NTPClient and TimeLib;
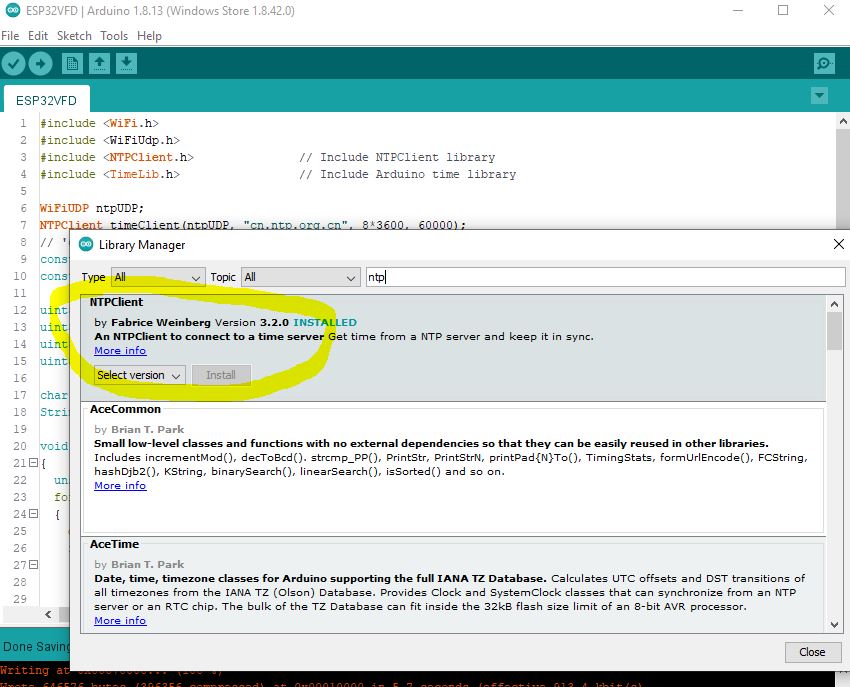
  • install the missing libraries, through menu Tools -> Manage Libraries...
The 2 libraries have been installed here
at the location specified in File -> Preferences:
  • compile, then upload successfully.
Surprisingly easy, straightforward and without glitches, this must have been the easiest ever first-time  interfacing with a device.

Compared to the HDSP-2534 LED display, the characters in the VFD module are about 50% bigger, and much brighter, making it readable from a greater distance. The current consumption is in the range 100-200mA, versus about 20mA taken by the HDSP display.


Also, at just about US$13, this (yet unnamed, or maybe Futaba?, see photo below) VFD display makes a great functional alternative for the more expensive HDSP/Avago/Siemens/Osram 8-character LED displays.


For the record, this was my setup:


And the (modified, barebone) sketch:
#include <WiFi.h>
#include <WiFiUdp.h>
#include <NTPClient.h>
#include <TimeLib.h>

WiFiUDP ntpUDP;
NTPClient timeClient(ntpUDP, "cn.ntp.org.cn", 8*3600, 60000);
const char *ssid     = "<wifinet>";
const char *password = "<password>";

uint8_t din   = 33; // DA
uint8_t clk   = 12; //23; // CK
uint8_t cs    = 13; //19; // CS
uint8_t Reset = 27; //22; // RS

char *str_time = "00:00:00";
String format_time = "00:00:00";

void write_6302(unsigned char w_data)
{
  unsigned char i;
  for (i = 0; i < 8; i++)
  {
    digitalWrite(clk, LOW);
    if ( (w_data & 0x01) == 0x01)
    {
      digitalWrite(din, HIGH);
    }
    else
    {
      digitalWrite(din, LOW);
    }
    w_data >>= 1;
    digitalWrite(clk, HIGH);
  }
}

void VFD_cmd(unsigned char command)
{
  digitalWrite(cs, LOW);
  write_6302(command);
  digitalWrite(cs, HIGH);
  delayMicroseconds(5);
}

void S1201_show(void)
{
  digitalWrite(cs, LOW);
  write_6302(0xe8);
  digitalWrite(cs, HIGH);
}

void VFD_init()
{
  // set number of characters for display;
  digitalWrite(cs, LOW);
  write_6302(0xe0);
  delayMicroseconds(5);
  write_6302(0x07);  // 8 chars;
  digitalWrite(cs, HIGH);
  delayMicroseconds(5);

  // set brightness;
  digitalWrite(cs, LOW);
  write_6302(0xe4);
  delayMicroseconds(5);
  write_6302(0x33); // level 255 (max);
  digitalWrite(cs, HIGH);
  delayMicroseconds(5);
}

void S1201_WriteOneChar(unsigned char x, unsigned char chr)
{
  digitalWrite(cs, LOW);
  write_6302(0x20 + x);
  write_6302(chr + 0x30);
  digitalWrite(cs, HIGH);
  S1201_show();
}

void S1201_WriteStr(unsigned char x, char *str)
{
  digitalWrite(cs, LOW);
  write_6302(0x20 + x);
  while (*str)
  {
    write_6302(*str); // ascii
    str++;
  }
  digitalWrite(cs, HIGH);
  S1201_show();
}

void setup()
{
  WiFi.begin(ssid, password);
  Serial.begin(115200);
  Serial.print("Connecting.");
  while ( WiFi.status() != WL_CONNECTED ) {
    delay(500);
    Serial.print(".");
  }
  Serial.println("connected");
 
  timeClient.begin();

  pinMode(clk, OUTPUT);
  pinMode(din, OUTPUT);
  pinMode(cs, OUTPUT);
  pinMode(Reset, OUTPUT);
  digitalWrite(Reset, LOW);
  delayMicroseconds(5);
  digitalWrite(Reset, HIGH);
  VFD_init();
}

void loop()
{
  timeClient.update();
  format_time = timeClient.getFormattedTime();
  char *str_time = &format_time[0]; 
  S1201_WriteStr(0, str_time);
  Serial.println(timeClient.getFormattedTime());
  delay(1000);
}

Next step should be researching the PT6302 command set, finding out how to adjust brightness and others.


Tuesday, April 14, 2020

Electronics kits for kids

Continuing on the topic of "Introduction to Practical Electronics" course, today we are going to look at some of the electronics (soldering) kits available and suitable for the purpose.

What makes a good beginner electronics kit?
  • easy through-hole soldering
  • includes a variety of components
  • reasonably priced (this is relative; what may be expensive for me may be cheap for you)
  • standalone and all-inclusive: does not require extra parts/components/modules sourced from third parties and does not require loading software;
  • interesting (as opposed to boring) functionality: flashes LEDs, displays something on a screen, makes some sounds etc.
  • relative simplicity of the circuit, so it can be easy to understand and debug if necessary
  • aesthetics of the board (shape, colour, component placement etc.)
  • preferably open source
  • powered by low voltage (battery, USB, power adapter)
  • digital electronics rather than analog (easier to debug, if necessary)
  • practical utility: use it for a utilitarian purpose rather than forget about it once built
  • expandability: can be either integrated as part of a bigger project, or its capabilities and functionality can be extended by adding modules or parts
  • provides extra learning (besides soldering) by displaying information: wave forms, frequencies, binary/hex number representation, musical notes, proverbs etc.
  • satisfaction guaranteed once assembled and working  :)
Here is a list, in no particular order, of beginner kits I found to match some of the above criteria.

1. Elenco AM Radio kit


2. Chinese Radio kits: A, B


3. 6-digit LED Clock kit


4. 4-digit LED Alarm Clock kit


5. 4-digit LED Talking Clock kit


6. Elenco two-tone European Siren kit


7. Retro Classic Game (Tetris, Snake etc.) kit


8. 3D Christmas Tree Flashing LEDs kit


9. Electronic Piano kit


10. Electronic 16 Sound Music Box kit


11. Astable Multi-vibrator Circuit Learn kit


12. Mini Speaker Box Amplifier kit


13. Aviation Band Radio Receiver kit


14. Calculator and Counter with LCD and Keyboard kit


15. "Three Fives" Discreet 555 Timer kit


16. TV-B-Gone kit


17. MintyBoost kit


18. MintySynth kit (now discontinued)


19. Drawdio kit


20. Electronic Hourglass LED kit


21. Round LED Clock kit


22. Signal Generator with XR2206 Adjustable Frequency kit


23. Solder:Time Desk Clock kit


24. Geiger Counter kit(s)


25. Wristwatch LED kit


26. Burglar Electronic Alarm kit


27. Conway's Game of Life kit


28. Music Synthesizer kit


29. Line Following Robot kit


30. Jameco Atari Punk Console kit


31. 555 Forrest Mims Project kit(s)


32. Tesla Coil kit


33. Velleman voice changer kit


34. Various badges (Maker, Day of Geek, Unicorn, and many many others)


Saturday, March 21, 2020

Teaching Electronics to Kids

My "Introduction to Practical Electronics for Children" course concluded successfully a few weeks back, before March break. Now, with schools closed for covid19, it would be a good time for the kids to practice soldering and learn by doing. At this stage, I think it is easy to expand their knowledge and skills in the field of electronics just by assembling kits.

Here are a few notes and observations from my teaching.
  • Each class had 6 groups of 3 students sharing a soldering station. This (not my decision) was probably based of space constraints (6 desks in a normal-sized classroom) and safety/supervision considerations. It worked pretty well: the 2 students (in each group) not soldering had time to observe, analyze, think and to ask lots of questions. Two professional teachers assisted, with supervision, helping the students and keeping discipline.
  • Each student had their own "HDSP clock" kit to assemble. It took 6 one-hour sessions to complete, with a success rate of about 95% (2 failures out of 38 assembled, because of solder bridges).
  • The intended "50% theory and 50% practice" ratio had quickly become 10/90. Still managed to introduce components (resistor, capacitor, crystal), electrical concepts (AC vs DC, voltage, resistance, current, frequency) and units of measures (Volts, Farads, Ohms, Hertz). We even talked about Tesla batteries :)
  • Some parts were lost (e.g. crystal) or damaged (dropped, then stepped on by accident) between or during the classes. The lesson learned is to have extras available.
  • Each student received individual instructions, guidance, assistance and supervision on soldering. We came up with the "3-second rule" to make a good soldering joint: hold the tip of the soldering iron in contact with the pad and the terminal for 3 seconds while touching and melting the solder wire on the tip.
  • Having students pay attention to the instructions was very important. It saves energy to talk once to the whole class, rather than answering the same question to each individual. (I also learned from professional teachers  the "1-2-3 eyes on me" attention-getter.)
  • Sockets for integrated circuits are a must in a beginner kit. Imagine fixing an IC soldered in the wrong orientation! (The "worst" that happened was that all 3 ICs in the kit were soldered directly onto the board, luckily in the correct orientation.) Also, silkscreen should be as detailed as possible, indicating the component's place. In case of the "HDSP clock" kit, the students were able to easily identify the placeholders for each component, just by using logic (except for the resistors; they learned quickly to bend the resistors' terminals).
  • Some of the most frequent mistakes were soldering bridges and filling empty holes with solder. Bridges were easily fixed (initially by me, then the students learned to do it themselves) using the copper wick/braid, and flux. To fix the solder-filled holes, I had to use a tailor pin (part of my EDC Swiss card).
  • Surprisingly, every student showed interest in working on, and completing, the kit. I think it was a successful experiment even for the school, in making "practical electronics" as part of their curriculum. Like in the old days of practical skills teaching (wood working for boys, sewing or cooking for girls), this course demonstrated that Grade 6 students are very capable and eager to acquire skills that may stay with them for life.

Sunday, March 15, 2020

Teardown of an Old Dimmer Switch

The 40+ year-old dimmer (made by Nortron Industries Limited in Milton, Ontario) in my attic broke down. Electronically, the dimming circuit still worked, but mechanically, the push button got stuck.
This is what's inside, for the curious.


The active component in the circuit is Q2006LT, a "quadrac" which, according to the datasheet, "is an internally triggered Triac designed for AC switching and phase control applications. It is a Triac and DIAC in a single package, which saves user expense by eliminating the need for separate Triac and DIAC components".

The "reversed-engineered" schematic looks like this:


For those who want to understand more on how the triac-controlled dimmer works, this article provides an in-depth explanation.

The 250V capacitors may be reused in a Nixie high-voltage (~170V) power source. For a hoarder, both the choke and the potentiometer (push button removed) look good.

I will report back on the internals of the replacement switch in 40 years or so, when it breaks down. I hope I/it last(s) that long.