Showing posts with label XBee. Show all posts

Sunday, March 29, 2015

Modding WiFiChron with GPS or Bluetooth

The latest revision of WiFiChron has an XBee socket (beside the ESP8266 8-pin socket), which allows the addition of a few individual features:
  1. GPS-based time synchronization, by using the GPSBee;
  2. displaying messages sent from a Bluetooth device, by using the BTBee/BLEBee;
  3. displaying data acquired from an XBee/ZigBee network of sensors (not implemented yet);


Things did not go smoothly, without some drama though. Naively (I always seem to forget that there is a difference between theory and practice), I designed the XBee/ESP to connect to the serial port, with the expectation that once the development (including testing with debug statements to the serial monitor) is done, I will just plug in the serial module (either XBee of ESP8266) and things will work properly. Well, I had to re-consider this approach once again. Luckily, I had two pins left available (D7 and D17), which I could use for software serial. I re-wired those to the XBee/ESP and used the hardware serial for console communication. Until the next board revision, anyone wanting to follow will need to re-route a couple of traces manually, as shown in the photos below (cuts are red-circled).


A few details on my implementation of the GPS time sync (so that one doesn't need to look at the code to figure it out):
  • user can set a timezone (stored in eeprom, default is -1); there is no (easy) way to determine if the timezone was set or not, since -1 (eeprom byte being 255) is a valid value;
  • estimate the timezone from the longitude, assuming that a every 15 degrees is an hour difference;
  • a difference between GPS estimated timezone and the user-set timezone of more than 2 hours would mean that the time is way off and the user did not set the timezone; in this case, blink the display; a difference of 2 hours or less would be acceptable (for many reasons, including summer-time, or variations from the "15-degrees-longitude-per-hour" approximation);
  • in any case, the minutes and seconds are set from the GPS data;
  • date and day are not set/synchronized at all (currently);
  • the GPS sync is scheduled to happen every 10 hours (and also after a reset);
  • a successful sync is indicated by an up arrow at the end of the scrolling date (e.g. March 29, 2015 ^).
I will publish the code as soon as I have a chance to polish it (and also test it with BTBee).

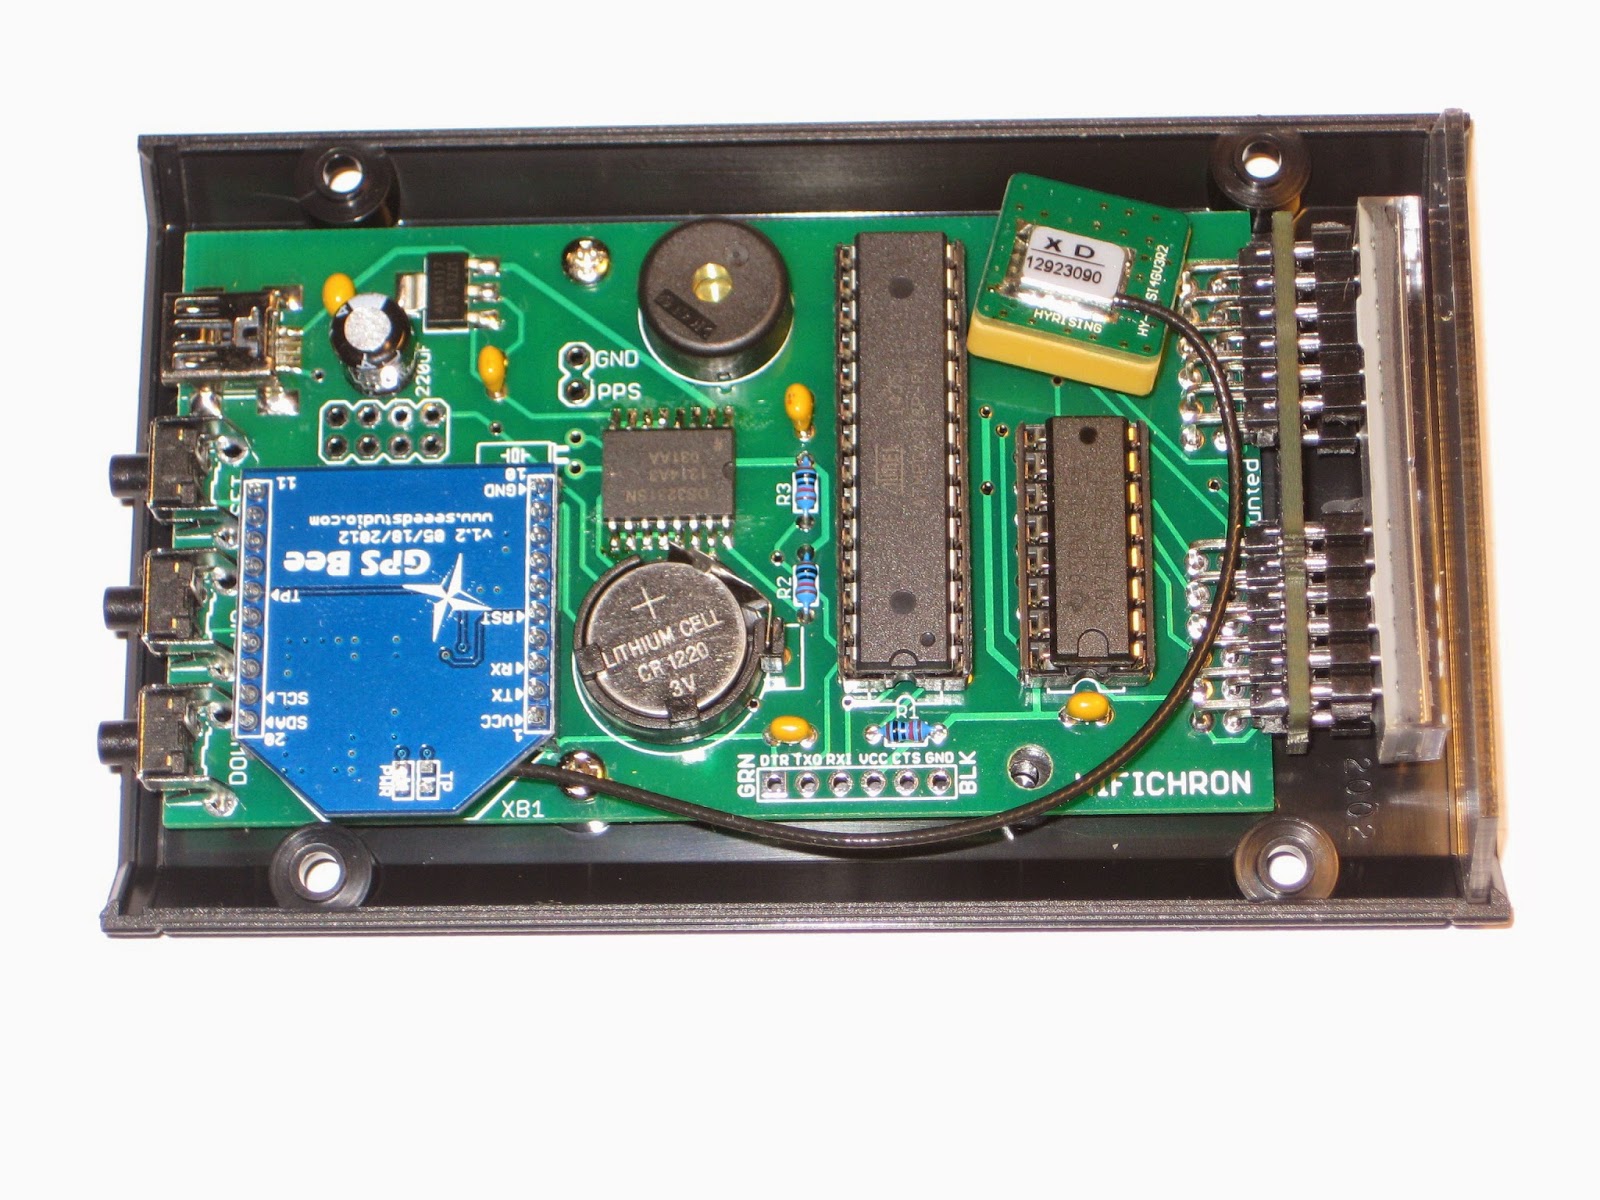
As you can see in the photo below, the GPS antenna fits well in the case. It also works well: the GPS has good reception inside the house, 5 meters from the closest window.


Saturday, November 26, 2011

Testing the XBee on Wise Clock 4

To test the XBee on Wise Clock 4 I used the sketch below (upload it to the board; display is not required).

int nCount = 0;
void setup()
{
  Serial.begin(9600);
  Serial1.begin(9600);
  Serial.println("WC4 XBee ready for comm..."); 
}


void loop()
{
  // read from port 1, report characters on port 0:
  while (Serial1.available())
  {
    char inChar = Serial1.read();
    Serial.print(inChar); 
  }
  Serial1.print("WC4 XBee transmit ");
  Serial1.print(nCount++);
  Serial1.print(", ");
  Serial1.println(millis());
  delay(3000);
}

Notice the use of Serial1 instance to talk to the XBee, since this is connected to the second hardware serial port of the ATmega644P (D10/D11, pins 16/17). Had Sanguino offered no support for the second USART, we could have used NewSoftwareSerial library.

The second XBee is linked directly to a terminal (e.g. HyperTerminal in Windows, or Terminal panel in the X-CTU application from Digi). I personally used the XBee Adapter from Adafruit, connected through the FTDI cable to the PC as shown here.

Once this XBee test passed, you can adapt the Wise Clock 4 software to display any message sent to it from a second XBee. A simple hack is to add to the function fetchMessage() in file WiseClock4.cpp, as shown below:

void WiseClock4::fetchMessage()
{
  // new code for XBee............
  // read from XBee into the "personalized message" buffer;
  char* Ptr1 = &personalMsg[0];
  if (Serial1.available())
  {
    while (Serial1.available())
    {
      *Ptr1++ = Serial1.read();
    }
    *Ptr1 = 0;
  }

  // existing code................
  strcpy(msgLine, "      ");

Now, instead of the personalized message (read from file message.txt on the SD card) you will get whatever is sent from the terminal application (second XBee).

Don't forget to add this line in function setup (file WiseClock4.pde):

  Serial1.begin(9600);


Wednesday, November 16, 2011

Wise Clock 4

The new Wise Clock 4 board has two main improvements over Wise Clock 3:
  • support for the XBee family of wireless RF modules (XBee, XBee Pro, XBee Wi-Fi, and the similar foot-printed Roving Networks WiFly RN-XV);
  • ability to easily connect a second display; this is achieved by moving the power connector on the "right" side, plus bringing the extension display connector closer to the bottom of the board.


Wise Clock 4 is "almost" compatible with Wise Clock 3. To run the existing sketch on Wise Clock 4, two changes are required:
  • Plus button is now on D3 (D2 is now designated for interrupts from RTC);
  • D15 is now connected to the CS line of the display, replacing D11, which is now used for communication with the Xbee module.


As can be noticed from the photos, a few more components are in SMD package (necessary to keep the size of the board to a minimum, to fit in the back of the 3216 display):

  • the level shifting buffer 74HC125;
  • three optional LEDs: 2 for the XBee communication lines, one for power;
  • the 3V3 voltage regulator MIC5219, capable of providing 500mA.


Updated Nov 26, 2011
The schematic, pictured below, can be downloaded from here (Eagle file).


The board layout, shown below, can be downloaded from here.


Thursday, February 11, 2010

Wiseduino and XBee

This is a long-overdue piece of documentation, which I started many months ago and never had a chance to finish. It may not be totally complete even now, but at least it gives some direction towards the integration of the XBee radio and Wiseduino.

One of the features of Wiseduino is the ability to plug in an XBee adapter from adafruit, in the designated 10-pin female header (provided in the Wiseduino kit). The intention is for this header to be soldered on the back of the board, as shown in this photo:


The XBee adapter should be plugged in as shown in the following photo:


Beside the wireless communication, the XBee adapter provides a few more services:
  • remote sketch upload;
  • 3V3 for the main board, usable by other shields (about 50 mA worth);

In order to use it with Wiseduino as in the setup shown above, the XBee adapter requires a few little modifications.

1. The first is a trace cut, as pictured below:


Basically, the two extreme holes for the header are connected together, and to 3V3. We are going to use one of these redundant connections for our purposes, and that is to access XBee's pin D3 from the Wiseduino board (as explained in adafruit's XBee tutorial).

2. Secondly, the straight header (provided in adafruit's kit) must be soldered perpendicular to the board.

3. Thirdly, a wire needs to be soldered between D3 and the extreme left pin of the header (the one that was isolated at step 1 by cutting the trace).


Before inserting the XBee radio module, the adapter should look like in the photo below.


After the hacks are done, for the remote sketch upload, just follow adafruit's great tutorial.
Notice that the small circuit with the transistor in the mentioned tutorial is already implemented on the Wiseduino board.

Related posts: