Saturday, November 29, 2014

From the mailbox (with software updates)

New software for the Bubble clock from MikeM:
I have the bubble LED shield working with the DS1337 RTC & LiPo shield.  I have it alternating the display with the battery voltage every 2 seconds right now.  I don't have a voltmeter handy, so I haven't verified what is displayed with actual voltage.  It started fully charged at 4.2v and has now dropped to 4.1v.  It should start blinking at 3.45v, and go to sleep at 3.3v.
I started with your original bubble sketch from the blog posting, but then had to remap all the display pins from the schematic.  The current version of the SevenSeg library doesn't match your code, so I had to make some adjustments.
I also changed the SevenSeg library code to even out the brightness.  It looped through all the segments and turned on each appropriate digit, then delayed and turned everything off.
I changed it to loop through all the digits, turning on each appropriate segment.  Once all the appropriate segments are lit, it turns on the current digit, delays, then turns everything off, then moves to the next digit.  With the previous method some segments were bright and some dim, depending on what was displayed on the other digits.
I also changed the SevenSeg library to not blank leading digits.  It now displays 01.36 for 1:36 AM.  I left it as a 24-hour clock.  I can only display a decimal point, not a colon.
Thanks again Mike!

From ScottH, another version (HDSP.ino only; the rest of the files are unchanged) of the HDSP clock sketch adds scrolling of the time and date and improved setting. Thanks Scott!

From DaveC [on the HDSP clock]:
Here are the pictures.  Hope you find it interesting, unique at least.   There is a slide switch in the back with selections Solar charge, USB charge, USB run (the default mode of the kit), and battery run where you press that button on the front to turn on and display the time.   I used a solar/USB  charge board from Adafruit as I am no EE to figure out how to charge a battery from solar and USB with all of the correct regulated voltages etc.  The case is made from corian and in the top view those speckles are a kind of metallic flake in the corian, the center band is pure black. 


From EricL [on the HDSP clock]:
We got the package last week and my 13 yr-old grandson and I soldered it together and powered it up. Works perfectly!! Then I got your Arduino code for it and programmed it with a flashing ':' between hours and minutes and between minutes and seconds. Then I set the date in the RTC and changed the code again. Now it shows the date for 2 seconds every minute. Nice! Thanks for a great project!

From GregoryK [on the HDSP clock]:
Your kit is fantastic. Simple but well thought out. Thanks for bringing it to the market!
I would like to use it in one of my classes at Stanford as an "intro to soldering" and "intro to Arduino hacking" (they already will be familiar with the Uno) project.

From IvanS [on Wise Clock 4]:
Thank you Florin for the very thoughtful and entertaining  gift. Anything based on electronics is always interesting to me. We have been reading the famous quotes all day. It was a pleasure to meet you [...]

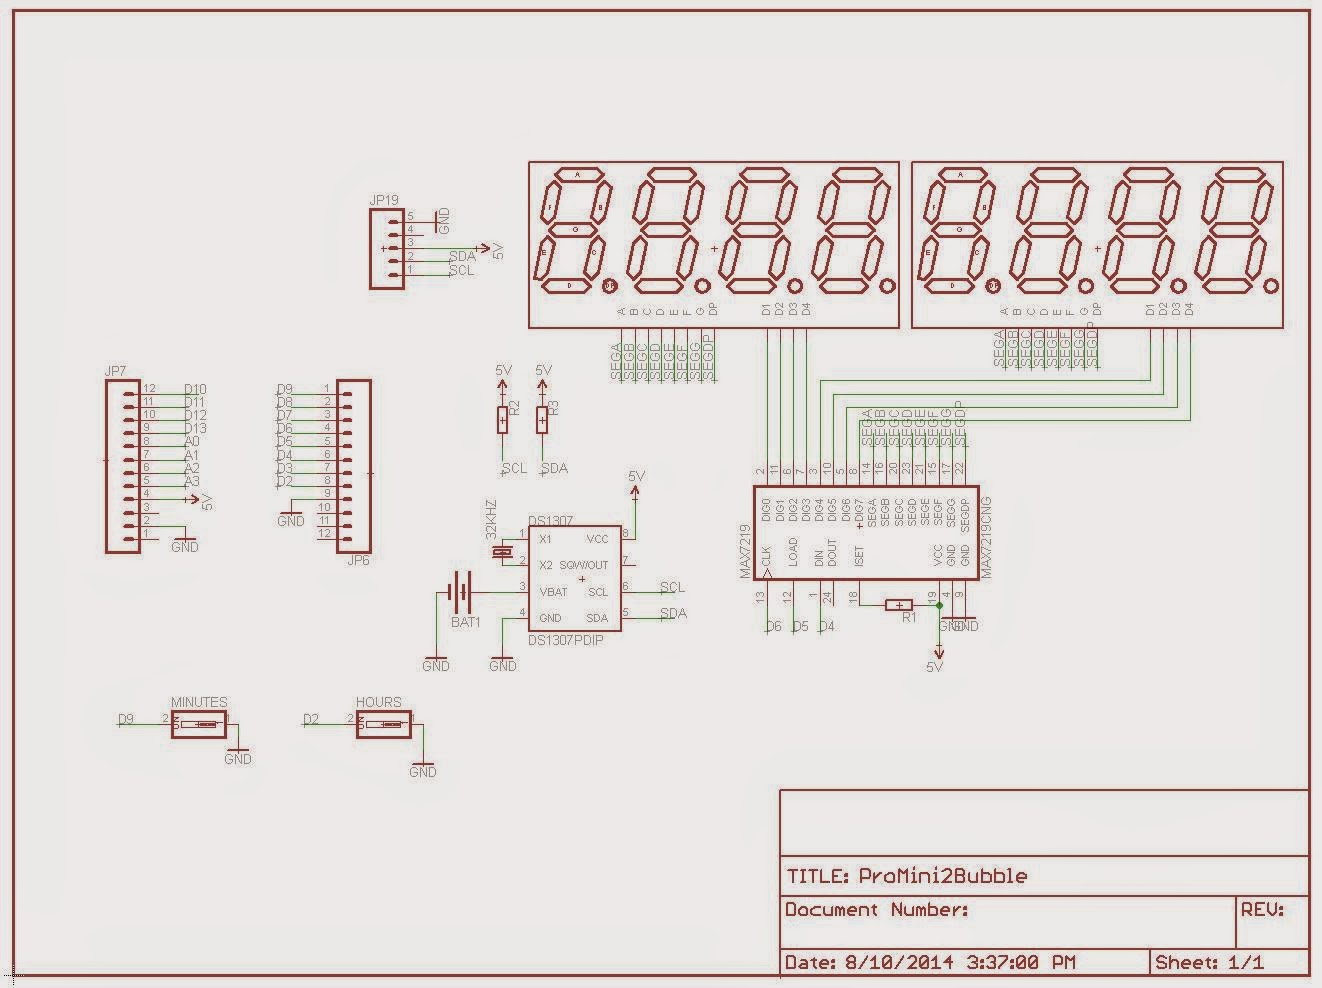
"Double Bubble Clock" shield for ProMini

I could have added a second bubble LED display to my "bubble clock" by connecting the anodes for the 4 new 7-segment digits to the only 4 pins left available: D0, D1, A6 and A7.
Instead, I preferred to use the expensive ($8+) LED driver MAX7219. Luckily, I got mine a long time ago as free sample from Maxim, and this was my chance to use it. As one can expect, the "double bubble" clock can display the seconds, plus the date and day of the week.


Below are the 2 bubble clock versions side by side. Both are ProMini shields, so ProMinis get plugged on their backs. I designed them to stand by themselves with the electronics exposed and on the open, as shown in this post. I am not sure if this is a good idea, but designing (or finding) an enclosure seems even a bigger challenge.


The sketch, included below, uses the LedControl library (communicates with MAX7219 through SPI).

#include "LedControl.h"
#include "Wire.h"
#include "DS1307.h"

#define PIN_DIN          12
#define PIN_CLK          11
#define PIN_LOAD         10
#define PIN_BTN_SETHOUR  2
#define PIN_BTN_SETMIN   9

int hour, minute, second;

// read time from DS1307 at intervals;
#define MAX_TIME_READING_COUNTER  1000
long timeReadingCounter = MAX_TIME_READING_COUNTER;

LedControl lc = LedControl(PIN_DIN, PIN_CLK, PIN_LOAD, 1);

void setup()
{
  // MAX72XX is in power-saving mode on startup, we have to do a wakeup call;
  lc.shutdown(0,false);
  lc.setIntensity(0,8);
  lc.clearDisplay(0);
  pinMode(PIN_BTN_SETHOUR, INPUT_PULLUP);
  pinMode(PIN_BTN_SETMIN,  INPUT_PULLUP);
}

void displayTime()
{
  // hours;
  lc.setDigit(0, 4, hour/10, false);
  lc.setDigit(0, 5, hour%10, false);
  // minutes;  
  lc.setDigit(0, 7, minute/10, false);
  lc.setDigit(0, 0, minute%10, false);
  // seconds;
  lc.setDigit(0, 2, second/10, false);
  lc.setDigit(0, 3, second%10, false);
  // delimiters (optional);
  lc.setChar(0, 1, ' ', true);
  lc.setChar(0, 6, ' ', true);
}

void loop()
{
  checkButtons();
  timeReadingCounter++;
  if (timeReadingCounter > MAX_TIME_READING_COUNTER)
  {
    getTimeFromRTC();
    displayTime();
    delay(5);
    timeReadingCounter = 0;
  }
}

void getTimeFromRTC()
{
  int rtc[7];
  RTC_DS1307.get(rtc, true);
  // check to avoid glitches;
  if (rtc[DS1307_MIN] < 60 && rtc[DS1307_HR] < 24 && rtc[DS1307_SEC] < 60)
  {
    second = rtc[DS1307_SEC];
    minute = rtc[DS1307_MIN];
    hour   = rtc[DS1307_HR];
  }
}

void setTime(int hh, int mm, int ss)
{
  getTimeFromRTC();
  RTC_DS1307.stop();
  RTC_DS1307.set(DS1307_SEC,  ss);
  RTC_DS1307.set(DS1307_MIN,  mm);
  RTC_DS1307.set(DS1307_HR,   hh);
  RTC_DS1307.start();
}

void checkButtons()
{
  // increment hours and minutes;
  if (LOW == digitalRead(PIN_BTN_SETHOUR))
  {
    hour++;
    if (hour>23) hour = 0;
    setTime(hour, minute, 0);
    delay(400);
  }
  if (LOW == digitalRead(PIN_BTN_SETMIN))
  {
    minute++;
    if (minute > 59) minute = 0;
    setTime(hour, minute, 0);
    delay(400);
  }
}

Since it's a shield, the board requires a ProMini. The device takes about 50mA.
Schematic and board are shown below.


I shared the PCB layout at OSH Park, so anyone can make their own.

Thursday, October 23, 2014

OLED clock with Pacman mode

This large 2.42" OLED I2C module can be used as a replacement for the smaller 0.96" display for which I originally designed the ProMini OLED clock shield. It is built around the same SSD1306 chip, and it only comes in yellow (for now).

MikeM wrote this great Pacman clock sketch for it (available for download here), shown in the video below.


To display on the OLED, Mike used U8glib graphic library. Initially tested on the 0.96" OLED, the sketch froze after some time, for a yet to be explained reason. The same sketch works perfectly with the 2.42" display. Mike spent a lot of time trying to figure out if the culprit is software (bug in the U8glib) or hardware.
(Any feedback on this issue is greatly appreciated.)

The clock can also display the time as HH:MM:SS on the whole screen, as shown in the photo below, also courtesy of Mike.


My next step would be to design an enclosure for it. For that I will probably need some more help :)

Update Nov 29, 2014, from MikeM:
A lot of credit goes to MikeR, I took the Tetris and Pacman faces from his sketch and adapted them for the OLED shield.  The Pong code is modified from the WiseClock sketch.  The digital, analog, and QR code faces are mine, although I did use a QR code library I found.  I did credit MikeR inside of the code.

Sunday, September 28, 2014

Blast from the past

MikeM sent this photo he took of the guts of the revolutionary-at the-time Sinclair Black watch beside the Bubble clock shield.


Mike also noticed odd behaviour of the clock shields (both bubble and OLED) when powered from the 3.7V LiPo battery (as shown here). After a while, the RTC returns bogus time. A quick check of the DS1307 datasheet (page 3) confirmed my suspicion:
When 5V is applied within normal limits, the device is fully accessible and data can be written and read. When a 3V battery is connected to the device and VCC is below 1.25 x VBAT, reads and writes are inhibited. However, the timekeeping function continues unaffected by the lower input voltage. As VCC falls below VBAT the RAM and timekeeper are switched over to the external power supply (nominal 3.0V DC) at VBAT.

Therefore, if one really wants the clock(s) powered from LiPo, a step-up converter must be used.
Another solution is to replace the DS1307 with the (almost) pin-to-pin compatible DS1337. This one does not provide support for a backup battery, relying instead on the main power (Vcc). Which shouldn't be a problem with a LiPo. The software would need to set the ATmega328 to sleep when the LiPo voltage drops under a certain (e.g. 3.5V) value. Once the display goes blank, the user should know it's time to charge the battery. (Note that another nice feature of DS1337 is alarm capabilities.)

I actually went through a similar exercise in the past, when I had to pick DS1337 over DS1307, for the exact same reason, but I forgot about it.

Conclusion: do not use DS1307 when the design calls for powering from 3V3 or directly from 3.7V LiPo.

Wednesday, September 24, 2014

Adding RF remote control to Wise Clock 4

Nick asked me once about adding remote control to his mega wise clock, similar to those pictured here (or any wise clock that may hang on a wall, for that matter). An obvious way to quickly and easily do this is by wiring the "simple RF M4 receiver" from adafruit to the 3 buttons of the Wise Clock. This 315MHz receiver module works in conjunction with the 4-button keyfob, also from adafruit. Note that the receiver comes in 3 flavors: momentary, toggle and latch. The one that "simulates" the touch buttons is the momentary one, hence the "M4" in the name (momentary, 4 outputs).

The schematic I used to connect the receiver module to the Wise Clock board is shown below.


I tested it and it works fine. Almost always :)
That is, ALWAYS when the display is not plugged in the clock board, NEVER when the display is connected. Which led me to conclude that either the display emits in the 315 MHz band (interfering with the receiver module; which it didn't; I checked by shielding the receiver in a metal case, wire antenna out), or it gets the power too dirty for the receiver.

An oscilloscope would have quickly answered my question. But since I don't have one, I tried all kinds of power adapters (from the fake-$1-on-ebay iPhone ones, to genuine 2A Samsung), up to batteries (4xAA). Incredibly, only the latter did the trick. Again, to emphasize, this is ONLY when the 3216 display is connected.

Below are some photos of the setup.


Note how the receiver is powered directly from the AA batteries. There is a common ground with the clock board though (black wire).


The LEDs are not mandatory, I added them just for visual feedback. They light up when either the board's or keyfob's buttons are pressed.

In any case, using the batteries to power the module is just to prove that this solution works. To be practical, I should add a DC-DC step-up voltage converter. According to the PT2272 datasheet (the chip on the M4 receiver), the module can be powered from 5V to 10V. I am not sure a boost converter would work in this case, unless it outputs really clean voltage, but it's the only practical solution I see at the moment.

Once I have this figured out, I plan on designing a small add-on board. The receiver module will plug into this add-on board, which will be connected to the Wise Clock's board through 5 wires.

As always, feedback (and help) is greatly appreciated.


PS I forgot to mention that I tried filtering the power with capacitors, up to 1000uF, with no success. (The 2-pin female header where the battery wires are plugged in were initially used to insert different capacitors.)