Updated Oct 4, 2010
The most recent version of Wiseduino has pin 4 of the FTDI connector wired to Vcc (5V). Therefore, when the FTDI connector is plugged in, the board is powered.
With the Wiseduino board assembled, we can start testing it by uploading some sketches.
To upload the sketches, you would need the FTDI cable or the FTDI breakout.
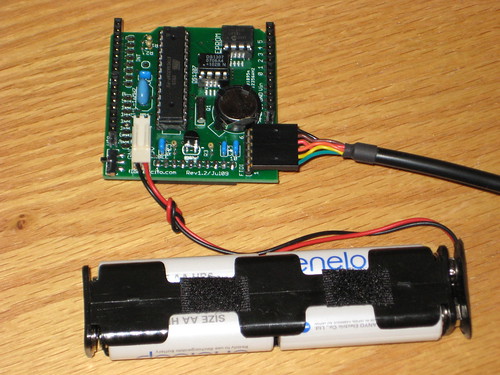
Make sure that the FTDI cable or the FTDI breakout are plugged in correctly, as shown in the photos below.
Also, make sure the board is connected to power (preferably 4 AA rechargeables) and the power switch is in the upper position, as in the above photos. This is because pin 4 of the FTDI header, with 5V coming from FTDI, is not connected to the board. There were two reasons behind this decision: 1) a switch between the external power and FTDI should have been used, and 2) FTDI cables and breakouts come in 2 flavours, 5V and 3V3.
Never power Wiseduino with more than 5V.
Do not connect the supplied battery snap to a 9V battery because it will damage your Wiseduino. The snap is for battery holders, normally holding 4 AA rechargeables (as in the above photo).
After launching the Arduino IDE, make sure the right board and serial port are selected, as shown in the images below.
Lets start by testing the RTC. First, download this sketch and install it (unzip it) in the arduino/hardware/libraries folder. A new folder, named rtc, will be created, and it will contain the RTC class (courtesy of Arduino playgroung) and the rtc.pde sketch in the examples subfolder.
Load the sketch into Arduino IDE (13 or later). Change the time in setup() function, then compile it and upload it to the board.
The sketch sets the current time into the RTC:
void setup()
{
Serial.begin(9600);
RTC.stop();
RTC.set(DS1307_SEC, 20);
RTC.set(DS1307_MIN, 49);
RTC.set(DS1307_HR, 19);
RTC.set(DS1307_DOW, 4);
RTC.set(DS1307_DATE,22);
RTC.set(DS1307_MTH, 1);
RTC.set(DS1307_YR, 9);
RTC.start();
}
then, almost every second, it retrieves the time from the RTC and it displays to the serial monitor:
void loop()
{
updateTimeBuffer();
delay(1000);
}
void updateTimeBuffer()
{
int rtc[7];
RTC.get(rtc, true);
int second = rtc[0];
int minute = rtc[1];
int hour = rtc[2];
int day = rtc[4];
int month = rtc[5];
int year = rtc[6];
Serial.print(hour);
Serial.print(":");
Serial.print(minute);
Serial.print(":");
Serial.print(second);
Serial.println("");
}
After uploading the above sketch once, the RTC has the current time and it will keep the time even when the Wiseduino board is not powered (due to the onboard backup battery). Now, modify the rtc.pde sketch by commenting out all lines in setup(), except Serial.begin. This will ensure that the microcontroller does not set the RTC every time the board is reset or powered.
Next, let's play with the EEPROM.
Related posts:
Name that Ware, January 2026
1 week ago


Am getting the following error when trying to upload sketches to my Wiseduino:
ReplyDeleteavrdude: stk500_recv(): programmer is not responding
I am running Arduino 0018, and connecting to the Wiseduino with Sparkfun's FTDI breakout, which so far has worked with other Arduino Pro Mini boards.
Was the bootloader installed on the ATMEGA328 chip shippped with my Wiseduino unit? Have you had any similar problems with the board before? Any assistance would be greatly appreciated!
The bootloader is installed (although not by me).
ReplyDeleteIs your FTDI breakout the 5V one (as opposed to 3V3)?
Did you select the right board and port from the Tools menu of Arduino IDE?
Here is an email from a fellow Wiseduino user who had a similar problem
ReplyDeleteavrdude: stk500_getsync(): not in sync: resp=0x00
avrdude: stk500_disable(): protocol error, expect=0x14, resp=0x51
(failure to upload sketch):
"Just wanna let you know that I've found a solution.... I just had to turn the wireless card off! Obviously, there was like some kind of interference between the board and the wireless card. If u're ever going to have problems with sketch uploading, try with this-it worked for me :)"
I would never have thought of this!